Before starting the project...
This project consists of three main components and is very easy to build for absolute beginners. This laser module can be programmed and integrated with an Arduino board to be used with a variety of real-life applications. The code, on the other hand, is super simple and easy to understand as it is only 11 lines long. Applications this can be used for are: emergency/safety lights, modes of communications, alert systems, laser pointers, etc.. The parts you will be needing for this project includes:
- 1 KY-008 Laser Module
- 1 Arduino (the Keyestudio Uno is used in this example)
- 2 Jumper Wires (Male to Female)
- 1 USB Data Cable (depends on the Arduino)
- 1 KY-008 Laser Module
- 1 Arduino (the Keyestudio Uno is used in this example)
- 2 Jumper Wires (Male to Female)
- 1 USB Data Cable (depends on the Arduino)
Mounting the circuit
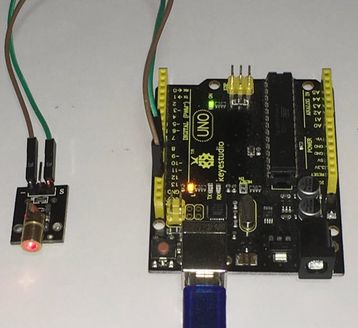
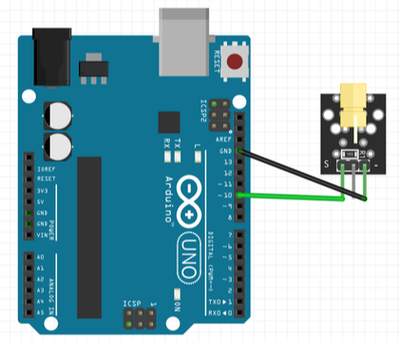
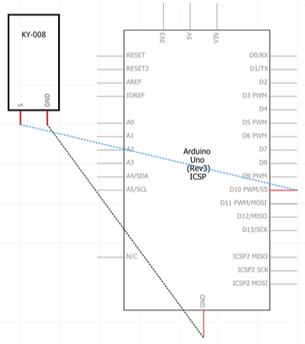
The hardware setup is easy with just three simple connections. First, make sure you unplug all power sources to your Arduino. Now, take one jumper wire and connect GND on your Arduino to GND on the KY-008 laser module as indicated by the (-) sign. Then, connect a jumper wire from D10 (digital pin 10) on your Arduino to the signal pin on your laser module as indicated by the (S) sign. That will be it for the mounting of the circuit.
THe code
Arduino KY-008 Laser Module Project Code
about the Code
The code consists of 11 lines including all the functions and strings. It starts off with declaring a variable called laserPin for digital pin 10 (D10). Then, we move straight onto our void setup where we set the pin we declared as an OUTPUT pin, sending information out from the computer to the module. We later move to our void loop section which composes of four main lines to the code. In the void loop, we start by setting the pin to HIGH, to turn the laser on, then wait for 100 milliseconds before turning the laser off, followed by delaying it by another 100 milliseconds. Since this is a loop, the whole void loop section repeats itself over and over again until the power is cut off. That's it for this simple project.
Make sure you check out the review for this module by clicking here.


