
before starting this project... |
Credits go to Netram Technologies.
|
This basic project is very essential especially if you are a beginner. It can be useful in the future when building security systems, collecting data, or making a robot. The code is very accurate, measuring in centimetres. If you didn't know, an ultrasonic sensor works when the waves it sends out bounces on the nearest object to it and bounces back measuring the distance between the two objects. This doesn't use much parts but the main part is the HC-SR04, a ultrasonic sensor. This specific sensor is good quality and can measure far distances easily. It can be found almost every where including various online stores. The parts needed in this project is:
- 1 Arduino (the Keyestudio Uno is used in this example)
- 1 USB Data Cable (depends on the Arduino)
- 4 Jumper Wires (Male to Male)
- 1 HC-SR04 Ultrasonic Sensor
-1 breadboard
- 1 Arduino (the Keyestudio Uno is used in this example)
- 1 USB Data Cable (depends on the Arduino)
- 4 Jumper Wires (Male to Male)
- 1 HC-SR04 Ultrasonic Sensor
-1 breadboard
mounting the circuit
|
|
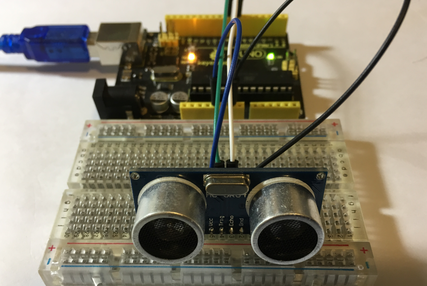
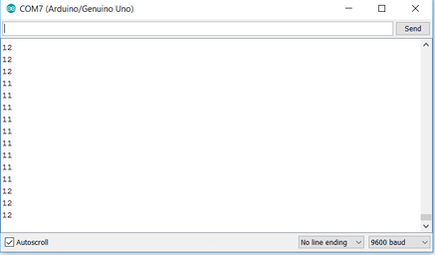
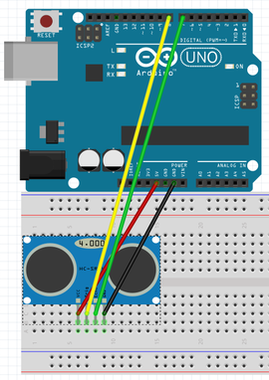
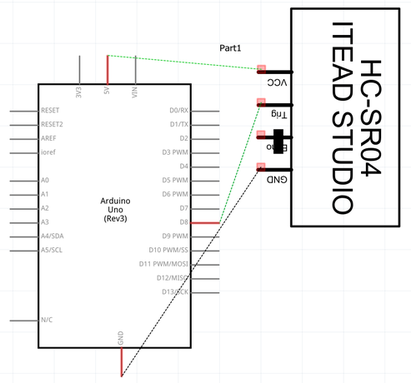
Let's start mounting the circuit. Always unplug the USB cable out of your computer for safety reasons. First, place the ultrasonic sensor horizontally onto the breadboard. Behind, the sensor, insert the 4 jumper wires into the pins. Connect the wire that is behind the VCC (+) on the sensor into 5v (+5 volts) on the Arduino. Next, connect the wire that is behind the TRIG (signal) pin on the sensor into D8 (digital pin 8). Then, connect the wire behind ECHO on the sensor to D7 (digital pin 7). Finally connect GND (-) on the sensor to GND(-) on the Arduino. Use the code below and open the serial monitor to 9600 bauds. You should see the results coming in through the sensor and onto serial monitor after uploading the code. Use the code below:
The Code
Arduino HC-SR04 Ultrasonic Sensor Project Code
about the code
The three first lines of the code are basically defining some of the ultrasonic sensor pins, it states which pins connect to which on the Arduino. The next three lines tell you what is the maximum and minimum distance the ultrasonic sensor can reach. Then we reach void setup, which only runs once. The first line of the void setup tells the serial monitor to start under 9600 bauds. Below, it defines whether the pins are sending info to the computer (OUTPUT) or sending information to the sensor (INPUT). The lines after void setup but before void loop will run only once at the beginning as a setup. Next comes void loop, which runs over and over again. The lines after void loop are going to loop while the code is running. In void setup, you are setting up the ultrasonic sensor and the serial monitor. In void loop, the different pins of the ultrasonic sensor are either on or off. The pins send information from the readings to be converted for us to read. One of the lines of codes mentions about the distance and whether it is going to show in centimetres. In the serial monitor, there's also a line of code which displays an 'out of range' message. The others tell you how long the distance is from the ultrasonic sensor to the nearest object in its perimeter. This is a basic explanation of the code done.
